

Skypix Portable Scanner for People On The Go
Written by Vlad on September 9, 2010 – 4:24 pm - 6,631 views
The Skypix Portable Scanner performs colour and greyscale scanning with a maximum resolution of 600dpi. It is shaped like a wand, which you slide across the document you want to scan. This allows you to easily scan pages from books and magazines, which is not possible with portable page scanners, like the popular Fuji Scansnap series.
The scanned images are saved in JPEG format onto a MicroSD card. The scanner connects to your computer via a mini USB cable and it appears like a removable flash drive – all the scanned JPEG images are placed inside a folder.
It is powered by two standard AA batteries, which provide enough power for about 200 scans.
It weighs just 210g (7.4oz) and is 25.4cm (10″) long – 4.4cm (1.73″) longer than the width of a sheet of A4 paper. The Skypix portable scanner is 3.05cm (1.2″) tall and x 2.79cm (1.1″) wide. This makes it easy to fit into a backpack or handbag.
The scanner comes with a drawstring bag, mini USB cable and a CD with bundled OCR software.
I bought it on eBay for just under $100 including shipping.
Why I bought the Skypix Portable Scanner
One thing that always tends to accumulate is paperwork. For me, this typically includes bills, letters, manuals, bank statements, contract notes, dividend statements and receipts. It starts when you come home late and you open your mail, and you put it on your desk, telling yourself “I’m tired. I’ll look at this tomorrow”. Within a few weeks, it is an unorganised stack of paper that you have to spend a whole day to sort through and file. Fortunately, a solution was imminent.
Tim Ferriss’s Ideas on Dealing With Paperwork
Of all the books I read, I was particularly inspired by “The Four Hour Workweek” by Tim Ferriss. He promotes a lifestyle based on building businesses that can be run online using outsourced labor and taking mini-retirements, to allow you to travel and pursue hobbies and other interests. This book generated a lot of controversy when it was released, but many of his ideas captured my imagination – In due course, I plan to do a road trip around the country and spend some time overseas.
Tim Ferriss had some fantastic tips on dealing with paperwork using a scanner. As a result, I now use my Canon MX7600 Multi Function Centre to scan in documents as soon as I receive them, and shred those with sensitive information using a cross-cut paper shredder. Unfortunately, I did not have a good solution for scanning documents when travelling or on the go.
Tim Ferris recommended the Fujitsu Scansnap 300 – a portable page scanner, but when I checked, it was quite expensive – about $300 here in Australia, and a bit heavy and bulky. It weighs 1.4kg (without the power adapter!) and measures 284mm x 95mm x 77mm. Also, it requires a computer to operate it. If I had to carry the Scansnap and my light Asus EEE PC 701SD netbook computer, this would add at least another 2.5kg to my bag. In addition, it has the aforementioned limitations of a page scanner. I reckoned I could do better.
My experiences using a Digital Camera as a Document Scanner
In the past, I have used a digital camera (Fuji Finepix F30) and mobile phone camera (Nokia E70 and HTC Desire) to take pictures of documents. These are my experiences:
- If you spend time lining up the camera carefully, adjusting the zoom and ensuring that the document is illuminated by broad daylight, and the document surface is not too glossy, you can get acceptable results.
- If you have to do this indoors, try and do it under fluorescent light – preferably a room with evenly-spaced banks of twin-tube fittings on the ceiling
- If you do not have fluorescent lighting or are taking a photo at night, you will have to use a flash. This often results in uneven illumination and washed out colours. Also, your camera will have to use a longer exposure or open the aperture more. Text will often appear grainy or blurry.
- Mobile phone cameras struggle to focus at short distances and have poor sensitivity. If you have no other option, they’re better than nothing, but a proper digital camera is better. Not only do they have better sensors and flashes, but most of them have a macro mode, which you can enable to help you focus at short distances
- If the document has a glossy surface, you can get specular reflection when you see the sun or the flash in the photo. To avoid this, you may have to take the photo at an angle. This may result in a skewed image
My conclusion is that you can’t beat the quality of a dedicated scanner. As a result, I usually took paperwork home to scan, whenever I could.
Discovery of the Skypix Scanner and the Decision To Purchase It
I still needed a solution for portable scanning when I was away from home, so I periodically did searches on eBay looking for a cheap or second hand Scansnaps. A few months ago, I stumbled across the Skypix TSN410. The low price under $100 caught my attention, but I was suspicious as it was a hand-held scanner. These were common in the early 90’s before flatbed scanners became affordable. The traditional problem with the hand-held scanners was that you had to hold them very steady, and move them slowly across the page to avoid distortion in the image. You see, USB 2.0 had not been invented, memory was expensive, and most of them used slow Parallel port interfaces, which struggled to handle the bandwidth of raw image data.
It has now been almost 20 years, so I thought it was time to see how technology had caught up. The Skypix TSN410 was reassuringly described as having a “real-time scanning detector to avoid any distortion”. Also, the specs stated that it could scan a 300 dpi colour image in 3 seconds and a 300 dpi greyscale in 2 seconds. For me, this clinched the deal.
A Closer Look At the Skypix Portable Scanner


The wand is designed to be be gripped with one hand between the thumb and forefingers. The palm rest is made from silver-coloured metallised plastic. It slides out the bottom to reveal the battery compartment, where the two AA batteries are located.
Just above the battery compartment is a silver button. This functions as both power on/off and start/stop scanning.

The LCD display is easy to read and shows the current scanning mode, resolution, number of scans stored on the microSD card, and remaining battery power.
On the left side of the LCD display, there is a button marked “C/BW” that switches between colour and B&W scanning modes. The “DPI” button switches between low resolution (300dpi) and high resolution (600dpi) scanning modes.
On the right side of the LCD display are two indicator LEDs. The “SCAN” LED illuminates when scanning is in progress. The “ERR” LED indicates that a problem has occurred when scanning, e.g. if the wand has been moved too fast, or if the microSD storage is full.

Underneath the Skypix scanner wand, you can see the sensor window and wheels. The sensor window is exactly the width of an A4 sheet of paper. This area should be kept clean of dust.

The right and left-hand sides both have white markings to help you align the scanner with the document you wish to scan.

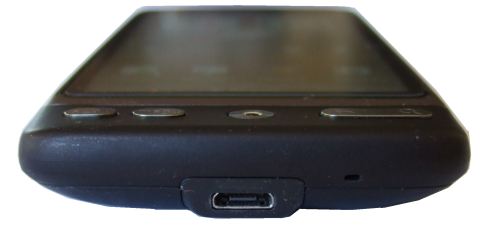
On the left-hand side, you can see the the time setting button, mini USB connector, the slot for the microSD card and the format button used to format or erase the microSD card.

This is what the scanner looks like inserted into the bundled drawstring carry bag. The bag is sealed shut with a draw cord (like a sleeping bag cover), to keep the dust out.
Examples of Scaned Images from the Skypix Portable Scanner
Here are a few scans I have made. They were made in 300dpi colour, but have been reduced in resolution to speed up display time. Click on them to see the large version.
A page from a phone book

A Telephone Bill

A Magazine Cover

Uses for the Skypix Portable Scanner
Note: Ensure that you are in compliance with copyright and all other relevant laws in your country and region.
1. Scanning When Travelling and Working in the field
2. Scanning Pages from Books and Magazines
3. Scanning interesting articles you read on the train or in a waiting room
Do you pick up and read newspapers and magazines that you find on the train, or when you are waiting at the dentist or doctor’s surgery? I know that I often read MX newspaper when on the train in Sydney. If you find an interesting article, you can scan it with the Skypix scanner.
4. Private detective/reconaissance
Are you a private detective or someone on a research/reconnaisance mission? You can swipe the scanner wand quickly across any documents, with a minimum of manual handling, and avoid wasting time turning on a computer or setting up a camera.
5. Scanning Documents Attached to Walls or Windows
Sometimes you want to scan something on a wall that cannot be removed, e.g. an artwork or poster. The Skypix Scanner can do that.
6. Scanning Old Photo Albums
Do you have an old photo album that is too bulky for a flatbed scanner, or is too fragile to allow you to remove the photos individually
Tips for getting the most out of the Skypix portable scanner
1. Store and transport the scanner it in the drawstring bag
This will keep the dust out and protect the wheels and sensor window
2. Bring a netbook computer with you to manipulate the images and/or make sure that they were scanned properly.
A small netbook or laptop computer is the fastest way to ensure that your images are scanned correctly. If you have Wireless Internet, you can also email or upload the scanned photos straight away.
3. Use the Skypix Scanner with a microSD-enabled Mobile Phone
If you have a mobile smartphone with a micro SD slot, like the HTC Desire, you can take the microSD card out of the Skypix scanner, and insert it into your phone. You can then send scanned images using 3G, WiFi or Bluetooth, depending on what your phone supports.
4. Scan at 300dpi
For me, 300dpi has always been a sufficiently high resolution for my scanning. The images take up much less space, and the Skypix scanner operates much faster. Here is a list of scanning speeds for a single page:
Greyscale 300dpi: 2sec
Full colour 300dpi: 3sec
Greyscale 600 dpi: 6sec
Full colour 600dpi: 13 sec
5. Use a smooth motion when moving the wand
It is not that hard to move it in a straight line because it has wheels, but if you bump it, or if the wand gets momentarily stuck on one side, your scanned image could have slightly curved edges. Your text will still be readable, but it will look a bit silly.
You may have noticed the two white lines on either side of the wand. These indicate the start and end positions of the sensor window. Ensure that the document you are scanning remains between these marks as you move the wand. Any part of the document that lies outside these lines will not be seen by the sensor.
6. Orient the scanner depending on the location of blank space around the item to be scanned
If you look underneath the Skypix scanner, you will note that there is a gap between the wheels and the sensor window. You must keep this in mind to ensure that you do not accidentally miss details when you are about to scan a document.
Position the scanner wand on the side of the document that has the most white space, and move towards the opposite direction e.g. left to right, righ-to-left, top to bottom, bottom-to-top.
7. Scan each item multiple times
This trick works equally well for photography and scanning. Even a small 2GB microSD card can store around 2000 colour 300dpi A4 images, so there’s no reason why you shouldn’t have several goes on the same document, and then choose the one that came out the best. This gives you some leeway in case you accidentally bump your hand or take a curved path.
Also, if the document has no blank space around the border area, you can combine multiple scans in an image editor to construct a perfect one.
8. Bring a spare set of AA batteries
You never know when you are going to run out of juice.
9. Wipe the sensor window with a soft cloth
A microfibre cloth, like the type you use to clean glasses or LCD monitors is best, though on occasions I have used my white soft cotton Bonds singlet.
Suggestions for Improvement
1. Preview screen
If they made a premium version, perhaps it could have a small LCD screen to preview the scanned image, with pan and zoom keys like a digital camera.
2. Bring the sensor window closer to the wheels
This would reduce the size of any “blind spot” at the border of the document.
3. Longer sensor window
The sensor window is designed to fit exactly across the width of an A4 page. If you are scanning an A4 document, you have to ensure that the sides of the document passes exactly along the two white lines on the sides of the wand. If they made the sensor window longer, it would make the scanner easier to use when scanning full-sized documents.
Tags: microSD, portable, scanner, Skypix, USB
Posted in Computer Hardware | 5 Comments »

By bruce on Sep 29, 2010 | Reply
looks good – wondering how it differs from the cheaper “mini” version
By Vlad on Sep 29, 2010 | Reply
As far as I can tell, they are the same. Some sellers just offer them cheaper, or are buying them internationally and selling them locally for a marked up price.
By Dave Smith on Sep 14, 2011 | Reply
Can the scanner operate in either direction?
That is, can I position the scanner in the gutter of a book with the sensor towards the gutter, and scan towards the edge of the page?
By Vlad on Sep 14, 2011 | Reply
Yes – I have tested both top-to-bottom and gutter-to-edge.
By Katey on May 16, 2013 | Reply
try xcanex